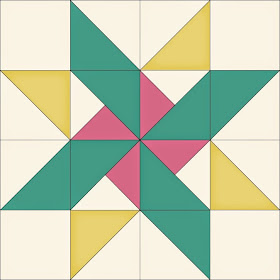
About a month ago my 14 year old daughter Emily was playing around with EQ7 (I love seeing them get into quilt stuff too!) and came up with this design. I really liked the pinwheel in the star and decided to make it up into a 12" block to go with my other Meadowsweet star blocks.
I thought other people might like to make it too, so here is the tutorial:
To make a 12" finished Pinwheel star, cut:
White
4 - 3.5" squares
4 - 4" squares
1 - 4.5" square
Pink
1 - 4.5" square
4 - 4" squares
Yellow
2 - 4" squares
Cut the 2 of the print squares on the diagonal.
Cut the 4.5" white and pink squares into quarters along both diagonals.
Draw a line along the diagonal of the four white 4" squares.
Lay out the white, pink and print triangles as illustrated. Sew the white and pink triangles together. (Tip: Feed the triangles into the machine blunt end first.) Press. Sew the print triangle onto the pink and white triangle unit. Press and trim to 3.5" square. Make sure that the seams all run into the points.
Match the white 4" squares with the remaining print and yellow 4" squares and make 8 half square triangle units as illustrated above. Press and trim to 3.5" squares.
Lay out all of the squares as shown. Sew together into rows. Press. Match seams and sew the rows together. Press.
Done!
Such a cute block. I just need to make a few more for the quilt! Have a great Thanksgiving week!


That is very cool! Thanks for the tute!
ReplyDeleteWho's the star??
ReplyDeleteThe pattern is awesome!
Your daughter absolutely beautiful!!
Two stars!!
What a sweet block!
ReplyDeleteValerie
Tell Emily that it is a great block -- hope she keeps designing. Nancy: rangerer@sbcglobal.net
ReplyDeleteLove this!! Thanks for sharing :)
ReplyDelete