
Here we are at last!!! Week 1 of the We Can Do It! Skill Builder Sampler. This week we will make a log cabin block. If you are already familiar with the log cabin block and feel confident in your skills, you might want to mix things up a bit and make a courthouse steps block using this tutorial. But for the rest of us, a log cabin is a must-make type of block.

It is one of the easiest and most versatile blocks around. It is formed by sewing strips of fabric around a central square of fabric. If half of the log cabin block is made out of light colored fabric and the other half out of dark fabric, multiple blocks can be arranged to form a variety of patterns. The possibilities are endless. (scroll down for instructions)
............
Edited (5/15): The Skill Builder Sampler will is available for purchase in book form! It has been renamed "You Can Quilt! Building Skills for Beginners" but covers the same skills with the easy, medium and challenging blocks and is a million times better than the original quilt along. It is perfect for the beginning quilter or the experienced quilter who wants to branch out and learn new skills. Find more information and order a signed copy in my Etsy shop or order on Amazon .
.
............
The goal with this block is to practice accurate cutting and sewing accurate 1/4 inch seams.
Fabric
Since this will be a stand alone block, you can either make it light/dark or mix a variety of different valued prints on both sides. I personally like to have a center square that stands out, but that is personal preference. Take out your fabric and start playing with it. You can repeat fabrics or have each piece be unique. If you use the same fabric on all four sides it will make a square within a square pattern.

Here is my layout. I apologize for the picture quality. My basement sewing room is not the best for pictures. Does anyone know if there is a type of light bulb that will help picture quality? Anyway...
I actually had to "try out" a bunch of fabrics before I came up with this layout. Play around with it and don't be afraid to cut extra pieces of fabric. I promise you will be able to use all the extra 2.5 inch strips that you cut later in the sampler.
To start off, if you aren't using fat quarters (18x22 inch pieces of fabric) cut your fabric in half so the piece you are working with is only 22 inches wide. Fold up the other half of the fabric and save it to use later on in the sampler. Why cut your yardage in half? It makes it easier to work with and none of the blocks we will be making will need a strip of fabric 44 inches long. You can cut all of your fabric in half now if you want or just the pieces you will be using.
Cut 2.5 by 22 inch strips of all the fabrics you will be using.
Let me break that down for you. To cut your strips, first square up the edge of the fabric. Squaring up means to trim the uneven side of the fabric so it is straight.


Pieces 1 and 2 are 2.5 x 2.5 inches
Pieces 3 and 4 are 2.5 x 4.5 inches
Pieces 5 and 6 are 2.5 x 6.5 inches
Pieces 7 and 8 are 2.5 x 8.5 inches
Pieces 9 and 10 are 2.5 x 10.5 inches
and Piece 11 is 2.5 x 12.5 inches

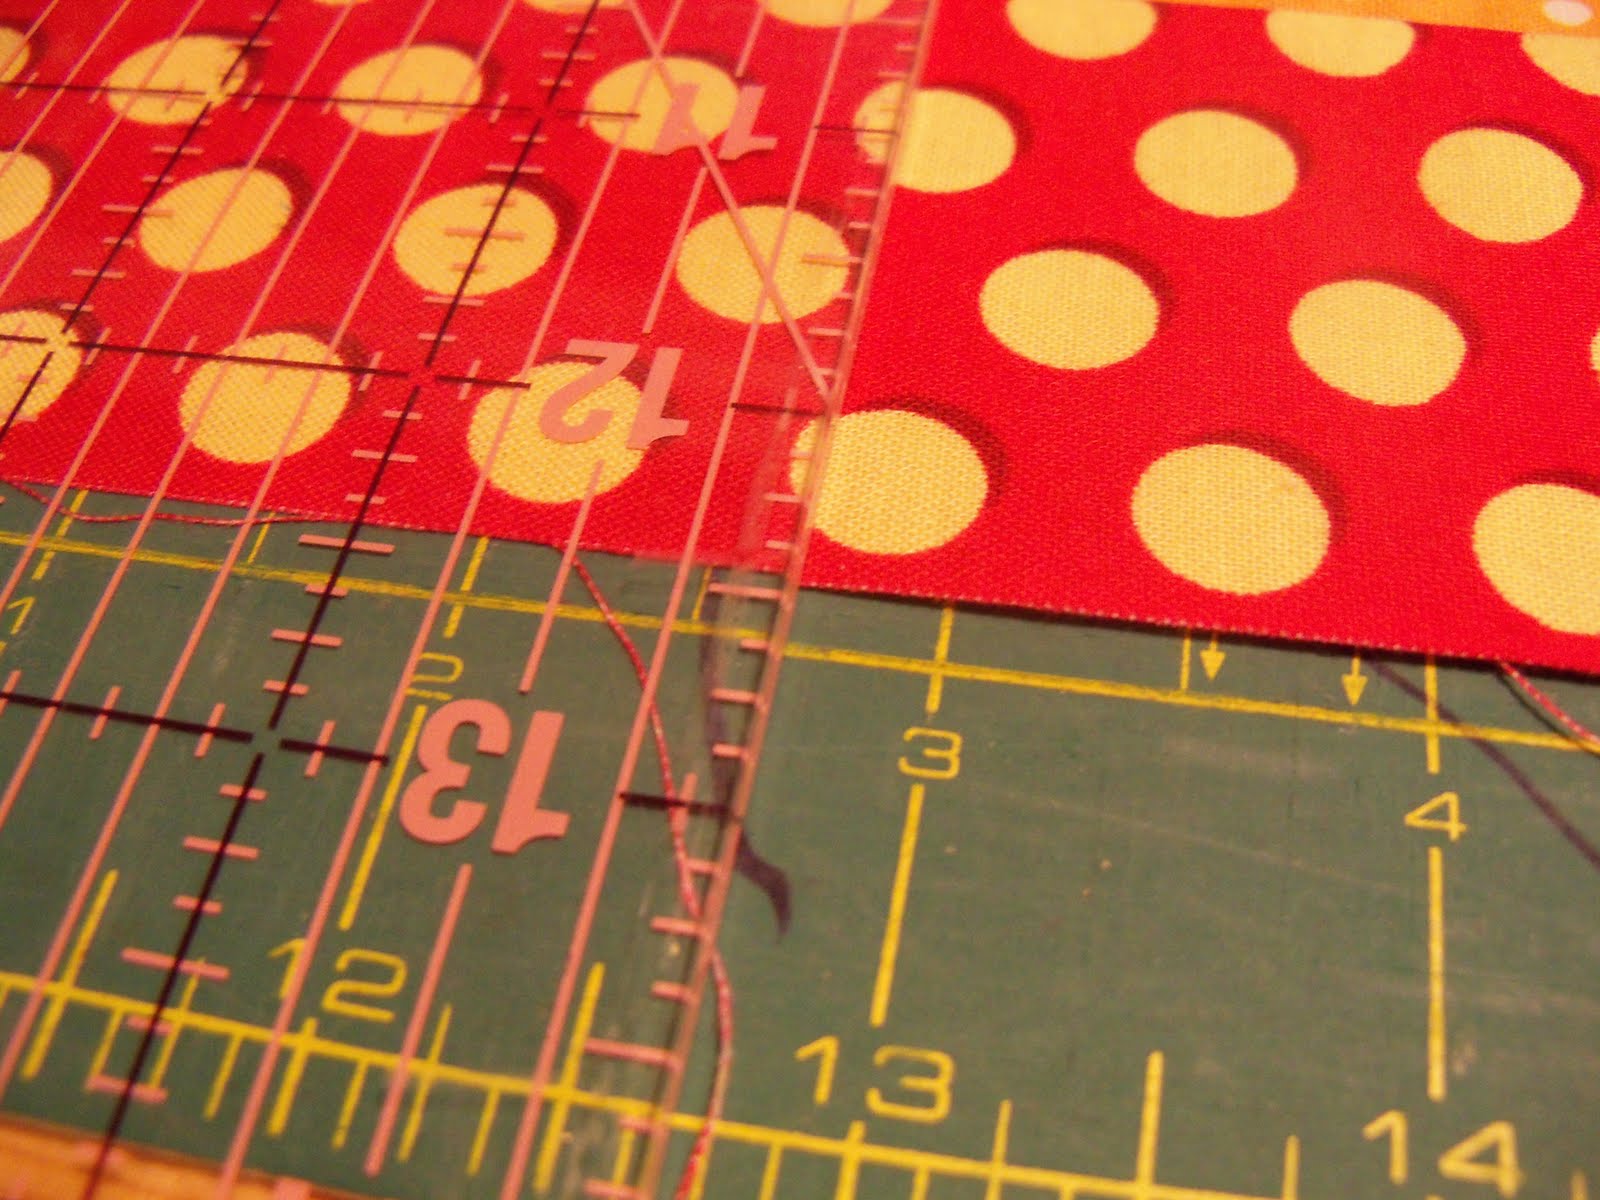
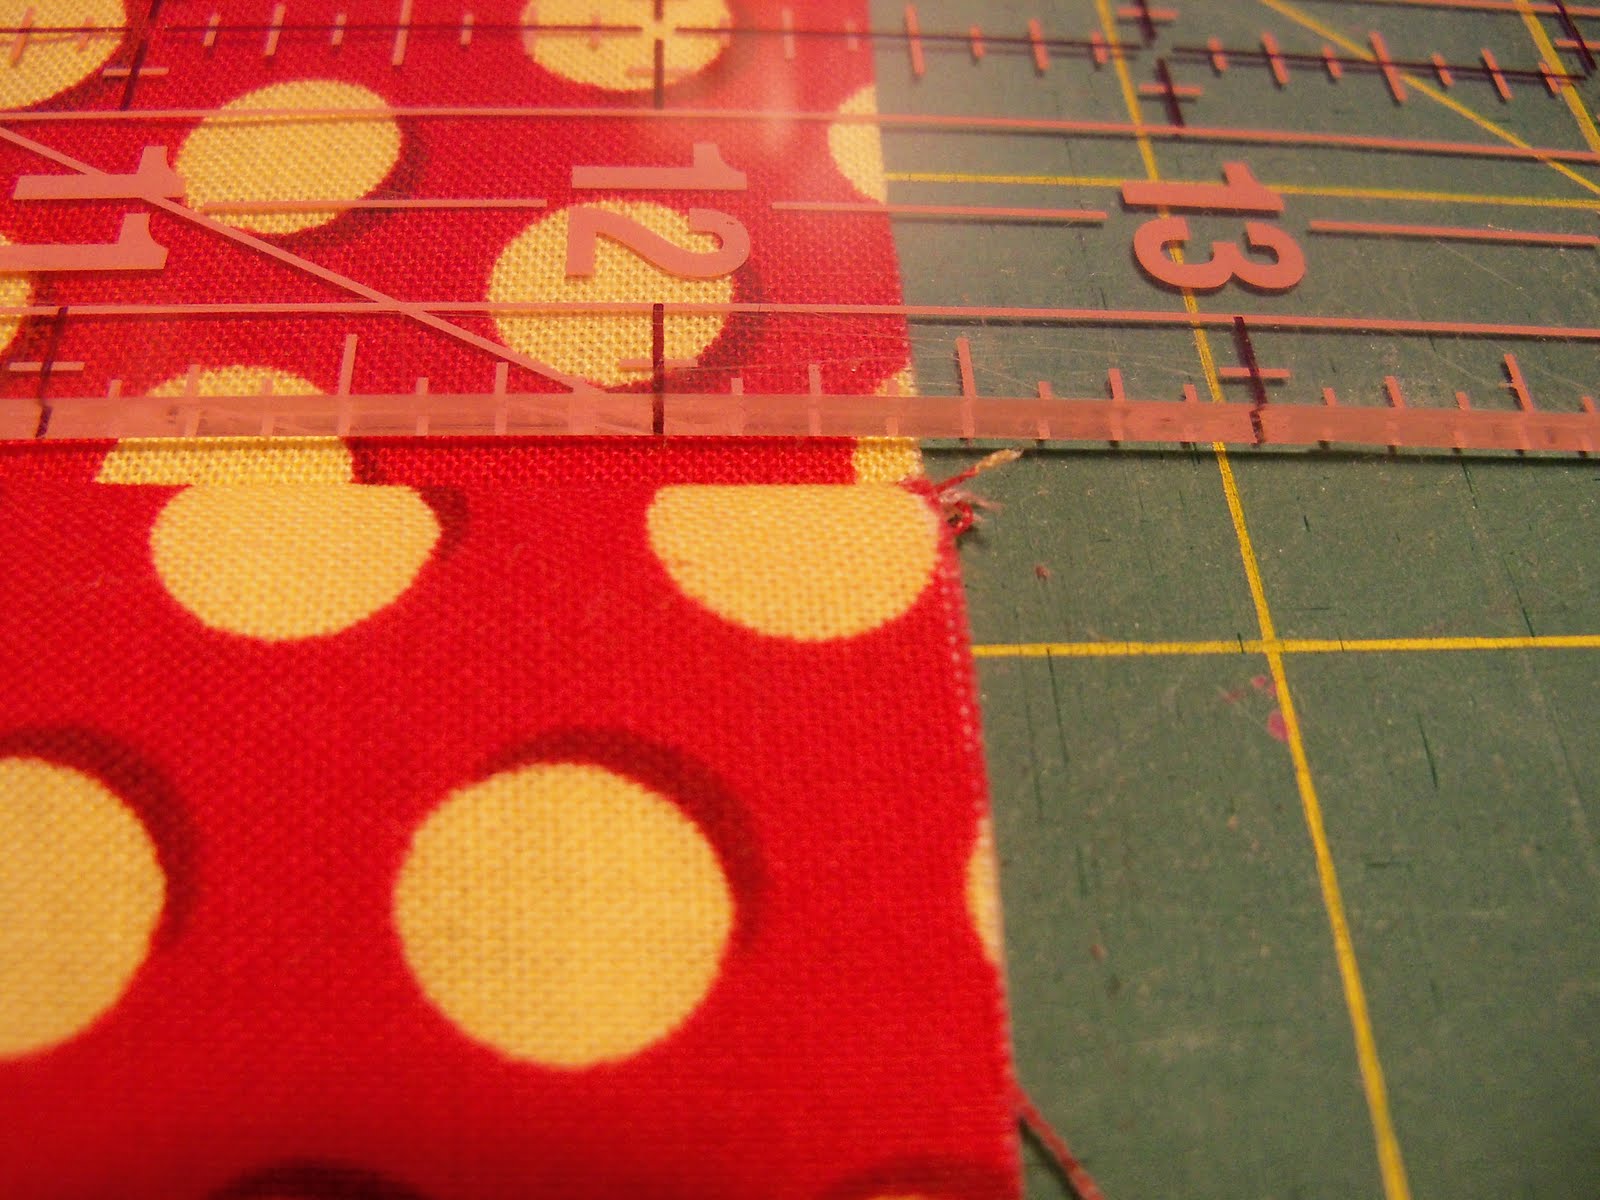
For example to cut a 2.5 x 4.5 inch piece you would:
- square up the end of the strip
- line up the top of the strip along an inch mark
- line up the short edge with the 4.5 inch mark
- and cut
Once you have your pieces cut it is time to get sewing!
To make sure we are sewing accurate 1/4 inch seam grab a scrap piece of fabric and sew 1/4 away from the edge.


To mark your 1/4 inch line, take a ruler and put the needle down on the 1/4 inch mark. Place a sticky note or piece of tape along the edge of the ruler. This is your 1/4 inch mark. Make sure when sewing you stay right on the edge of it, not on it. Try sewing a 1/4 inch seam again. Better? Then let's get going!
Sew Pieces 1 and 2 together
Put the two pieces of fabric right sides together and sew. With pieces this small it should not be necessary to pin, but if it makes you feel more comfortable, go for it.


To press, open up the fabric and iron flat. Give the fabric a gentle push with the side or tip of the iron to make sure the seam is pressed completely open. If the fabric is not completely open the block will be too small.


Whooo! We Did It!

Let me know if you have any questions. I would love to see your pictures in the groups flickr pool!
lol love how you reference you "professional diagram" :) This is a block I've made MANY of as I started an 80 block log cabin project. Pretty, easy to make, but looks fancy and complicated... great start!
ReplyDeleteI'm so glad you've posted this, I was raring to go. I'll hopefully get this done this weekend!
ReplyDeleteBelieve it or not, I've never made a log cabin block before. I need to join in this quilt-along so I can learn a few new skills!
ReplyDeleteI'm so ready for my fabric to be delivered! (hopefully today) I love looking at all the example squares. So much creativity.
ReplyDeleteYay! I'm so excited to get started!!!
ReplyDeleteLove the tips, very helpful. Espeically about keeping the left overs seperated by width. Can't wait to get home and make my block.
ReplyDelete~Kimberlee
Thanks do much. Look forward to getting started after I finish up a few UFO's I have on the table right now! So excited I have never done a Log Cabin. I was wondering if you could do a tutorial on different types of rules and what all the lines are used for?
ReplyDeleteQuestion - why is your center block not centered as it is in the example "2. Blue and red log cabin block"? Is there a way we can adjust or blocks so that the center square will actually be centered and still get the correct size finished block? I know it's crazy, but it will bug me if it's not centered.
ReplyDeleteGreat turtorial, it looks really easy to follow. I can't wait to get started! Not all of my fabric is here yet.
Thanks.
Jenn
Leila dear, you've seen LED lamps for sewing? If a lamp lit as well as small and light even imagine a ceiling. I think a good idea for your basement / sewing workshop.
ReplyDeleteI love that started the project. Today I want to put into practice!
Yay!! Week 1 is here. I have never done a log cabin block before and I really like the look of them. Thanks for this QAL series.
ReplyDeleteThanks again Leila for hosting this. It is going to be so fun!
ReplyDeleteThank you so much for explaining what a "scant" 1/4 inch seam is. I have never been able to figure this out.
ReplyDeleteAnother question - if you are able to make small increments of needle movement left and right, is it better to get an exact 1/4 inch seam or a scant one? My machine has a setting to make 0.5 mm left and right adjustments so I can get fairly close to an actually 1/4 inch seam. But is it better to try to get just inside?
Sorry for all the questions. You guys are going to get a lot of them from me. I’ve made exactly one quilt and I learned a lot on my own by doing but this is a fantastic opportunity to learn how to really do things properly.
Thanks again.
Ok, just thought of another question related to the last one. Does the exact 1/4 inch seam vs. a scant 1/4 inch seam matter so long as you are consistent? That is, if all my squares come out exactly 12.25 inches square I'm still ok, right? As long as I'm the only person working on the quilt. If I was contributing a quilt to a bee for example I'd have to be sure I was sending in a correct size block.
ReplyDeleteTold you I’d have a lot of questions. :)
Jenn
Shawn - the vertical and horizontal lines are for measuring and making right angled cuts. The diagonal lines are used for making angled cuts. Most rulers have 30, 45 and 60 degree angles marked on them. We will be using those lines later on in the sampler to cut out diamonds.
ReplyDeleteJenn -
I know, it not being centered bugs me too. If you want it to be centered there are two options. 1. cut the strips just a hair smaller than 2.25 inches wide (2.214 to be exact) and add an extra strip on the side. It was that odd measurement that stopped me from making it centered. Although I just realized that there was a simpler option. 2. Replace pieces 1,2 and 3 with one large central block that is 4.5 inches square. You will have a jumbo middle block, but it will actually be in the middle.
It is better to be scant. My seams are never exactly straight, so if I shoot for a scant seam it will vary between exact and scant. Also when you press there is a tiny amount of fabric that is "lost" as it curves up from the seam when you press it. Having a scant 1/4 inch seam will make up for this lose. If you are consistent it doesn't really matter, unless, you have a variety of blocks in your quilt. For example, a block that has tons of pieces will loose a bit for every seam and might end up closer to 12 inches than 12.5. But yes, if all of your squares end up at 12.25 you are just fine. There are even ways to fix and fudge blocks that are very off. It is just better to avoid the inevitable hair pulling and muttered oaths that entails. :)
Keep the questions coming!
Hi Leila, great tutorial ..very clear and easy to follow. I can't wait to see everyones blocks :)
ReplyDeleteThanks for getting started, I love log cabins and will make one on the weekend. By the way, I wonder if your centre square would be centred if you did two more logs so that you have three full rounds around the centre square or would that just unbalance it another way?
ReplyDeleteI find that the best lighting for fabric photos is natural sunlight. I usually take my blocks, or whatever I'm photographing, over to a white cabinet that I have right in front of a window, or even to the front steps of my house. Kind of a pain, when it's just easier to snap pics on your cutting table (which I still end up doing a lot anyway), but for the key shots, I go to the sun!
ReplyDeleteLeila- also, just to make sure I'm on track- should we be trimming all of our blocks to 12" square (if they aren't that already?). I looked through your posts about the sampler and couldn't find the block size, but maybe I missed it.
ReplyDeleteThx! I'll be posting my block on Flickr today!
NO!!! The block should be 12.5 inches square when you sew on the last piece.
ReplyDeletegreat post on the log cabin. I will be trying it very soon. As for the light I don't know of a good light but if you have a dslr you can try the lightscoop http://www.lightscoop.com/ I have one because I often take pictures inside at night. It works pretty well.
ReplyDeleteSo excited, can't wait to get started, just need my fabric order to hurry up and arrive!!! I know you talk about doing scant seams but as I like to press open rather than to one side I guess I need to aim for exactly 1/4? When do we need our blocks done by? Thanks for hosting this :-)
ReplyDeleteI am very pleased with my first block, though it bugs me that the centre isn't central. So I shall make another with the 4.5" central sqare, and see what that looks like. Thanks for that idea. Can't wait for the next block. Thanks for doing this.
ReplyDeleteI just posted a picture of my first block to the flicker group. I made a harder version of the Log Cabin block, because I'm pretty experienced with this type block. It was good practice at 1/4" seams, and measuring each step of the way. Thanks, Leila. Can't wait to see what we make next.
ReplyDeleteI probably should have asked this in the fabric requirements post but I forgot. I'll ask here since this is the most recent Q/A post.
ReplyDeleteIf we can't get fat quarters of some of our fabrics, will we be ok with 1/4 yards? Or do I have to get 1/2 yards? I just hate waste and I'm actually pretty poor right now so I don't want to overbuy.
Thanks again.
Jenn
I would start by buying 2 quarter yards each of light, medium and dark fabric and a half yard of a fabric you would like to use as a background. That is 2 yards total and should get you through a few months of blocks. If you want your background to be the same throughout the quilt be sure you pick a background fabric that you will be able to buy more of - you might even want to jot down the name of the fabric.
ReplyDeleteIf you live near a Hancock Fabrics, they have some great sales going on right now. Their clearance section is an additional 50% off now. LOVE IT!
If you would like me to be able to email you back directly you can go to the dashboard of your google account, click edit profile, check show email and click save at the bottom of the page.
I'm so proud of myself!! i did it! and it finished with a precision 12,5 in!!! and the back of the work is so clean and straight! i had never had this kind of accuracy before! thank you so much!
ReplyDeletejeanine, in Brazil
Okay so I should have measured at each step like you suggested so I know where I made my mistake. My block came out a little short. So what did I learn? Next time I am going to follow all of the directions and take the time to read. This is probably why I never dod well on tests. So I added some fabric to the end and will cut down the block when I need to. No big deal since it is just for me right? Thanks for the tutorial and I promise next week I will follow all of the suggestions.
ReplyDeleteBlogged at: http://creativeinspiraciones.blogspot.com/2011/06/sewn-we-can-do-it-sampler-block-1-log.html
Wow - this tutorial came at a perfect time for me. I have just finished piecing the top of my first ever quilt from Jeni's Warm/Cool HST QAL and I didn't really know what I was doing - so I basically winged it. Result: http://www.flickr.com/photos/63779039@N02/5859444247/in/photostream
ReplyDeleteIt's not too bad, but I could do with some practice. So, I'm going to joining in on your great QAL and learn to quilt properly :)
Well I did it, and it was a bit of a disaster! Not down to your tutorial, down to the fact I decided I didn't need to measure my seams after the first 2!! It turned out between 11" and 12" depending where you measured! I've blogged it here http://thecraftersapprentice.blogspot.com/2011/06/being-joiner-inner-but-not-joining.html
ReplyDeleteI don't know if I can flickr it as it's on my home pc...
Okay, I have a question.... I have no idea why but every time I iron my blocks after sewing the areas that have more fabric get dirty. Am I pushing too hard? I cleaned my iron and just don't get it any suggestions why this might be happening?
ReplyDeleteHummm... Check the bottom of the iron. Some of my irons as they got older wouldn't get completely clean or would still have some dirty cleaner stuck in the steam holes that would rub off. Clean it again and replace the water (just in case?). I can't think of anything else it could be.
ReplyDeleteI am loving this. I have posted your link on my blog. I have shared it with my quilty friends via email and on the board that I go to http://www.quiltingboard.com/t-132772-1.htm I love this board and everyone there. They are always ready and willing to help you. :) Thanks for dong this-I can't wait to get started!
ReplyDeleteJust finished Block 1. I don't know if I have to officially join this QAL or anything, but I'll be following. Can't wait to start on Block 2.
ReplyDeleteWhat cleaner do you use to clean your iron?
ReplyDeleteI did it!!! Came in at 12.5 on the dot... I will be honest though, the first attempt was ended half way through. Used a cheap ruler to find my 1/4 inch mark and was loosing ground rapidly by the 5th strip. So, I remeasured (Ooops!) and corrected the mistake. I feel like I won a major award! I am so excited to start the next block. :)
ReplyDeleteWell, I got mine done... it's about 1/8 shy of 12.5, but fairly consistant, so I'm just not going to stress. This is about learning and having fun, right? I'll take a pic and blog later. :-D
ReplyDeleteThank you! I have never heard of a scant 1/4 inch seam. That makes a lot of sense and I had worked it out on joining triangles to some degree but had not (for some inexplicable reason) worked out that if I did all my piecing that way the blocks would be right size. How does this work with a quarter inch foot? Do you just need to make the material does not sneak under the foot and out the other side? I am going to try and make this block today, as long as my other WIP projects don't shout too loud!
ReplyDeleteJust stumbled upon this QAL, and I'm so glad I did! My machine is getting its annual tuneup, and I plan to start this as soon as I get it back.
ReplyDeleteIn case you're still checking comments, I'll offer some insight to photo lighting: A few years back a photography instructor recommended the high-efficiency bulbs labeled "daylight" in ordinary shop clamp-lamps. Works like a charm for all sorts shoots. I was able to make it look like daytime in my backyard at 11pm! Also, make sure to set the white balance in your camera.
This is the easiest and precise directions I have found to learn the log cabin quilt block! Thank you very much!
ReplyDeleteHi, I believe the regular way to quilt a log cabin is in the ditch. Have you tried any other ways of quilting this pattern that work well. I also remember seeing a quilt as you go log cabin but can't remember how it was done. Have you tried this at all?
ReplyDeleteThanks,
Leandra
I don't know that there is any one way to quilt this block. You could certainly quilt in the ditch, but I also think it would look great with an all over meandering pattern.
DeleteHere is a great tutorial for QAYG log cabin.
http://www.stitchedincolor.com/2013/04/tutorial-quilt-as-you-go-log-cabins.html
Determined to teach myself a block a week. Your tutorials are so user friendly and helpfull that even I, a first week quilter, can understand. Thank you!
ReplyDeleteI just made my first ever quilt block thanks to your amazing tutorial! I'm going by hand but your instructions are so helpful and clear. I want to make a small (I guess crib or lap-sized) quilt of just log cabins, but I think afterwards I'm going to tackle your other tutorials and make a wicked sampler! Thanks so much!
ReplyDeleteWish I had found this tutorial a couple of years ago, but guess I will just be a bit behind your original QAL members. So glad this is still available. I have a tremendous fear of cutting fabric - fear which actually paralyzes me and brings me to tears. However, after reading the comments section I realize everyone has fears about starting something new whether they realize it or not. Thank you for teaching us, and sharing your in depth knowledge so well.
ReplyDeleteThanks for the tutorial. I've been away from sewing about 2 months after30 years. The time off had messed with the skills and feel for the fabric. Thanks for the inspiration. Gonna do the "we can do it" need some direction
ReplyDeleteLike! I'm going to adapt this design for my art class for artists with Alzheimer's. Thank you for making me courageous with your thorough directions and lovely pattern!
ReplyDeleteWhoooo Very Nice !!! Kindly visit Us @ Bank Exam coaching centre in Salem
ReplyDelete