I made this type of blanket for the first time when we lived in Texas. I needed a very lightweight blanket for my toddler so I simply pinned two pieces of quilting cotton right sides together, sewed around the edges (leaving a bit of a gap), flipped it right side out and stitched around the edges. We still have it and it makes a great lightweight summer blanket.
You can make this type of blanket from any two pieces of fabric. Two pieces of flannel make great baby blankets! But this time I wanted to make something heavier and supper soft.
For this blanket you will need:
- 1 2/3 yards of corduroy (44 x 60 inches)
- 1 1/4 yards of fleece (45 x 60 inches)
- 6.5 yards of rickrack
(Or use any two pieces of fabric that are the same size)
Step 1: Trim off the selvages and square up the fabrics to the same size.
Step 2: Pin the fabric right sides together.
Step 3: Place a bowl or plate on the corner and trace around it to round off the edge (this step is optional, but I like the look of a rounded edge).
Step 4: Trim off the corner.
Step 5: Using a 1/2 inch seam, stitch around the outside of the blanket. Stop stitching about 12 inches from where you started. You will want to leave a hole to turn the blanket right side out.
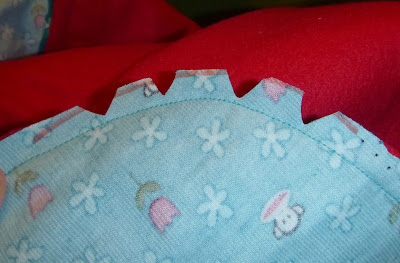
Step 6: Make some notches along the curved corners. This will help the fabric to lay flat when the blanket is turned right side out.
Step 7: Turn the blanket right side out.
Step 8: Fold the edges of the opening down and pin the opening closed.
If you are using fleece do not use an iron to press under! Fleece melts! Don't ask me how I know. ;)
Step 9: Stitch around the edge. If desired you can place a piece of jumbo rickrack on the edge of the blanket and sew it on at the same time.
Step 10: (Almost done!) Your blanket looks pretty great right about now, but if you have a blanket that uses cuts of fabric larger than 1 yard, you will notice that the two fabrics will tend to shift and pull apart. So in this step we are going to machine tie the fabric together.
Measure out a grid on the quilt and make a mark every foot or so with a pin or washable fabric marking pen.
Set your stitch width to the maximum (4 on my machine) and your stitch length to the minimum (0).
Place the foot of the machine on your mark and stitch back and forth about 20 times.
Trim off the threads and repeat.
You are done! This blanket only took an hour and fifteen minutes to make - including pictures! Definitely, quick and easy! :)
Here are a few more I made out on the clothesline. A two yard cut of fabric makes a blanket long enough for a teen (although a bit narrow), a 1 2/3 yard is perfect for a child 5 to 10 years old and a one yard cut is perfect for a baby or toddler.
It almost seems like "cheating" to make something so easy, but let me tell you, these blankets pass the kid test. I have had to hide them away to keep my girls from claiming them for their own! Sometimes the easiest is the best. :)
Remember, if you make a quilt for your favorite charity this month you can win some great prizes. More info here!


.jpg)
Such a great idea for a fast quilt project. The results are really pretty! Good for you to take the time to make these and share the love with others.
ReplyDeleteLove the ricrac. I need to try this.
ReplyDeleteCute blankets & quick, too! Thank you for your idea.
ReplyDeleteGreat tutorial and beautiful blanket
ReplyDeleteNice !!! Amazing tutorial Kindly visit us @ Bank Exam coaching centre in Chennai
ReplyDeleteGreat idea...and simple to do. Thanks for sharing!
ReplyDeleteGreat idea...and simple to do. Thanks for sharing!
ReplyDeleteNice article
ReplyDelete