Tuesday, January 8, 2019

Block 7 - Tiny Piecing Sampler

6" quilt block tutorial, made with foundation paper pieced Scrappy Triangles


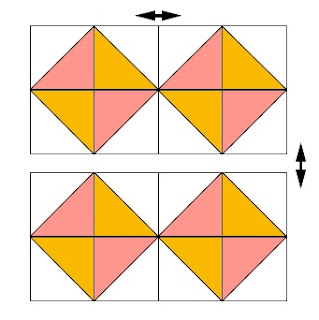
Alright, we are easing back into the New Year with this block. It's simple, but classic and fun. I used four different Scrappy Triangles, but you will be able to get some really fun effects by making four identical triangles. Each Scrappy Triangles foundation will make it's own unique secondary pattern when four are placed together. Play around and try out different options!

The 12" Block option is simply made with four of these 6" blocks. More chances to see what you can make!

Instructions

6" Block


Make:
 (4) 3" Scrappy Triangles


12" Block


Make:
(16) 3" Scrappy Triangles


1.  Arrange four 3" Scrappy Triangles so the pieced sections are pointing inward.

2.  Sew together into rows. Press seams open.

3.  Sew rows together. Press seams open. The 6" block is finished!

4.  For the 12" block, repeat to make a total of four.


5.  Sew the units together into rows. Press seams open.

6.  Sew rows together. Press seams open.

That's it!


----------
You can find all of the other blocks in the Tiny Piecing Sampler here.
You can find the 1", 2" & 3" Scrappy Triangle Templates here.
Find free 6" Scappy Triangle Patterns here.

I'll let you know when there are new patterns, tutorials & sales.

Friday, December 28, 2018

How to Choose Fabric for a Scrap Quilt


Got an overflowing scrap bin, but aren't sure how to choose fabric for a scrap quilt? Have you seen scrap quilts that are, well, just plain ugly and want to avoid that?  Me too!

(Sometimes you want the crazy/ugly scrap look, and that is fine, but if not, keep reading.)

I think the biggest mistake quilters make, when making a scrap quilt. is thinking that any fabric they use will work. To a certain extent that is true, but we have all seen quilts that somehow miss the mark and are a hot mess.

How to avoid way too crazy scrap quilts? Edit your fabric. That's right, don't use everything. Throwing everything together can sometimes work, but it can often go wrong. I'm going to show you three ways that I choose fabric for my scrap quilts.


Edit by By Color

Just because it's a scrap quilt, it doesn't mean it needs every color in your scrap basket. Use the same process that you use to choose fabric for your 'normal' quilts to limit the pallet of your scrap quilt. This is one of my favorite ways to choose fabric for scrap quilts.


For example, in this quilt I limited myself to yellows, pinks, and oranges with pops of green. Yellow, orange and pink/red are analogous (next to each other on the color wheel) so they naturally work together well. The pop of complementary green adds extra interest.


This version of the same quilt is a bit more chaotic, (I was going for quirky) but it still works well. I tried to limit it to clear (not muddy) tones with a heavier does of yellow and aqua.


I dug out all my blue, purple and black scraps for this quilt. (It has yet to be finished, sigh...)


When I think of color, I also think of tone. Are the fabrics, light, dark, muddy, clear, ultra bright? Choosing fabrics with similar tones makes it more likely that they will work together. This quilt I made for my brother is made of a variety of low volume fabrics (lights) with bits of my favorite Echino leftovers.


This orange and pink quilt is limited both by color and by value. There isn't a lot of contrast with these saturated colors. However, it works, because the design is so simple.

Edit By Designer

This might be the easiest way to choose fabrics for a scrap quilt. I don't know about you, but I have favorite designers and I tend to buy bits from multiple collections. How about pulling all of the scraps from one designer and using them in a quilt? A designer is going to have a cohesive color and style throughout their collections and most of their fabrics should work well together.


Here is a quilt where I used my bits of American Jane fabric.


But don't feel like you have to be super strict about just using fabrics from one designer. You can start with fabrics from one and then add bits and pieces that go well with them. For example, this quit was mainly made with Denyse Schmidt fabrics with some Cotton & Steel thrown in.

Edit By Theme


This works great for reproduction fabrics. All 1930's reproduction fabrics look great together and Civil War reproductions blend well too. This Grandmother's Flower Garden had a million different fabrics in it, but it worked because they were are 1930's reproductions.


You can also 'theme' by fabric type. With this quilt, I simply pulled out all my leftover bits (and fat quarters) of solids and started sewing them together.


This is a little harder to see, but all of these fabrics are dot-like. Some have standard polka dots, some have dot-like flowers, or cherries, or square-shaped dots. It's subtile, but it works.


This quilt's theme is obvious - Christmas! You can make any quilt a holiday quilt by combining fabrics in holiday colors. Grab all your red and green scraps for a Christmas quilt, your orange, blacks and purples for a Halloween quilt, and your reds and pinks for a Valentine's Day quilt.

To Recap

You don't have to throw all your scraps together willy-nilly. Take a bit of time to sort them out and make a conscious decision about which ones you are going to use. Think about choosing fabric for you next scrap quilt based on color, designer or theme.

I hope this has been helpful. Let's go make some scrap quilts! 

Happy sewing!


_________________


Looking for an epic scrap quilt adventure? Check out the 2019 Fresh & Scrappy Block of the Month Club. It's not too late to join. Click here for more information.


Tuesday, December 18, 2018

Block 6 - Tiny Piecing Sampler


I'm not going to lie, I did question my sanity a bit as I made this block. Sixteen 1" Scrappy Triangles? What was I thinking?!?  :)  But it was worth it!

For extra flair, try using four of the same Scrappy Triangles in the middle. They will make a fun secondary pattern.

Instructions


6" Block


Make:
(16) 1" Scrappy Triangles

Cut:

White
(4) 1 1/2" squares
(4) 1 1/2" x 2 1/2" rectangles

Print (mint in graphics)
(4) 1 1/2" x 2 1/2" rectangles

12" Block


Make:
(16) 2" Scrappy Triangles

Cut:

White
(4) 2 1/2" squares
(4) 2 1/2" x 4 1/2" rectangles

Print (mint in graphics)
(4) 2 1/2" x 4 1/2" rectangles


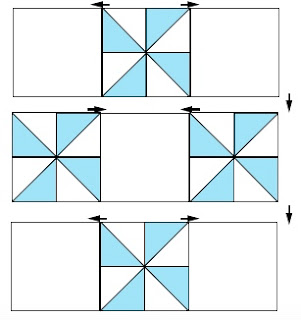
  1. Layout all units as illustrated above. 


2. Sew the White corner units to the adjacent Scrappy Triangles. 

3. Sew the remaining Scrappy Triangles together into pairs. 

4. Sew the rectangles together.

5. Press all seams in the direction indicated by the arrows.

6. Then sew the Scrappy Triangle pairs together into 4-patch units.


7. Sew the rows together by sewing Scrappy Triangle units to the rectangle units. Press towards the rectangles.

8. Sew rows together and press seams open.

----------
You can find all of the other blocks in the Tiny Piecing Sampler here.
You can find the 1", 2" & 3" Scrappy Triangle Templates here.
Find free 6" Scappy Triangle Patterns here.

I'll let you know when there are new patterns, tutorials & sales.

Tuesday, December 11, 2018

Block 5 - Tiny Piecing Sampler


I don't think that there is anything more classic than a pinwheel shape in quilting. It is simple, fun, and cute. In this quilt block tutorial, we will make 4 pinwheels out of foundation paper pieced Scrappy Triangles and join them together with some background squares. 

There is both a 6" and 12" version of the block. The size of the squares and triangles are different, but the block construction is the same for both blocks.

Let's get going!

Instructions

For the 6" Block
Make: 
(16) 1" Scrappy Triangles
Cut:
(5) White 2 1/2" squares

For the 12" Block
Make: 
(16) 2" Scrappy Triangles
Cut:
(5) White 4 1/2" squares

1. Lay out four Scrappy Triangles in the shape of a pinwheel.
2. Sew together into columns and press towards the unpieced triangle.
3. Sew columns together. Press seams open.
4. Repeat to make 4 pinwheel units.


4. Alternate the pinwheel units and the white background squares.


5. Sew units together into rows. Press towards the white squares.
6. Sew rows together and press.

There you go!
Stop by next Tuesday for Block 6.
----------
You can find all of the other blocks in the Tiny Piecing Sampler here.
You can find the 1", 2" & 3" Scrappy Triangle Templates here.
Find free 6" Scappy Triangle Patterns here.

I'll let you know when there are new patterns, tutorials & sales.

Tuesday, December 4, 2018

Block 4 - Tiny Piecing Sampler


Hello! It's week 4 in the Tiny Piecing Sampler. I think this might be one of the cutest blocks of the sampler, but maybe that's just because I used one of my favorite American Jane prints in it. It was one of the scraps that I had been holding onto for a long time. Anyone else do that? Well, it is fun to finally see it in a quilt. :)

This quilt block goes together fairly quickly and you 'only' have to make 8 Scrappy Triangles. The directions for both the 6" and 12" versions follow.

Instructions

6" Block

Make:
(8) 1" Scrappy Triangles

Cut:
White
(1) 2 1/2" square
(4) 1 1/2" squares
(4) 1 1/2" x 2 1/2" rectangles

Pink
(2) 1 1/2" x 2 1/2" rectangles
(2) 1 1/2" x 4 1/2" rectangles

12" Block

Make:
(8) 2" Scrappy Triangles

Cut:
White
(1) 4 1/2" square
(4) 2 1/2" squares
(4) 2 1/2" x 4 1/2" rectangles

Pink
(2) 2 1/2" x4 1/2" rectangles
(2) 2 1/2" x 8 1/2" rectangles


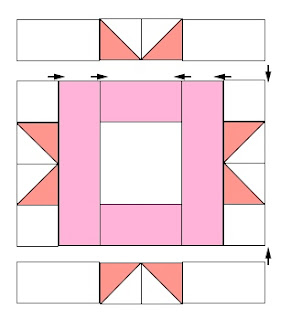
1.  Lay out the Scrappy Triangles and the other squares and rectangles as illustrated above. (Getting all of these arranged correctly is the hardest step. It is smooth sailing from here on out.)

2.  Sew the Scrappy Triangles and the adjoining squares and rectangles together. Press the seams of the Scrappy Triangles open to reduce bulk and press seams towards the white squares and rectangles.

3.  Sew the small Pink rectangle to the top and bottom of the large central square. Press towards the pink.

4.  Sew the middle block units together. First, sew the short Scrappy Triangle sets to the large pink rectangles and then onto the middle unit.  Press as indicated by the arrows.

5.  Sew the larger Scrappy Triangle sets onto the top and bottom of the center unit as shown.

There you are! All done!
Stop by next week for Block 5.

------------
You can find links to all of the blocks in the Tiny Piecing Sampler here.

You can find the 1", 2" & 3" Scrappy Triangle Templates here.
Find free 6" Scappy Triangle Patterns here.

I'll let you know when there are new patterns, tutorials & sales.

Tuesday, November 27, 2018

Block 3 - Tiny Piecing Sampler


Sometimes the simplest things are the best. A whole quilt made just with half square triangles arranged like this has been on my bucket list for years, but for now, let's just make one block.

The six and 12 inch block use different sized triangles for this block, but the construction is the same.

Instructions:

6" Block
Make
(9) 2" Scrappy Triangles

12" Block
Make
(16) 3" Scrappy Triangles

-Arrange Scrappy Triangles into rows.
-Sew together into rows.
-Press.
-Sew rows together.

Easy-peasy Lemon-squeesy.


You can find the 1", 2" & 3" Scrappy Triangle Templates here.
Find free 6" Scappy Triangle Patterns here.

I'll let you know when there are new patterns, tutorials & sales.

Tuesday, November 13, 2018

Block 2 - Tiny Piecing Sampler

6" and 12" quilt block tutorials made with foundation paper pieced Scrappy Triangles. Perfect for scrap busting and using up bits of leftover fabric.


I think this is one of the funnest blocks. It's simple but when multiple are put together, the chains (the 4-patch units) make great secondary patterns.

With this set of blocks, the 12" block is simply made from four of the 6" blocks.

Instructions: 

 6" Block
Make
(2) 3" Scrappy Triangles
Cut
(4) 2" squares from white fabric
(4) 2" squares from yellow print fabric

 6" Block
Make
(8) 3" Scrappy Triangles
Cut
(16) 2" squares from white fabric
(16) 2" squares from yellow print fabric


6" and 12" quilt block tutorials made with foundation paper pieced Scrappy Triangles. Perfect for scrap busting and using up bits of leftover fabric.
-Sew the yellow and white squares together into 4-patch units as illustrated.
-Arrange the 3" Scrappy Triangles and 4-patch units as illustrated.
-Sew together into rows.
-Sew rows together

For the 12" Block, repeat to make (4) 6" blocks.
-Arrange the 4 block in two rows of two. Play with the orientation, if desired.
-Sew together into rows.
-Sew rows together

Easy peasy, lemon squeezie! :)

Note: We are going to be out of town next week for Thanksgiving, and internet access is going to be iffy. So I am going to skip posting next Tuesday and will be back with Block 3 on Nov 27th. If you are feeling itchy to sew, I'd just make a ton of Scrappy Triangles, especially 1" and 2" blocks. Then they will be ready to go as we make future blocks.

See you then!

------------
You can find the 1", 2" & 3" Scrappy Triangle Templates here.
Find free 6" Scappy Triangle Patterns here.

I'll let you know when there are new patterns, tutorials & sales.

Tuesday, November 6, 2018

Block 1 - Tiny Piecing Sampler


Welcome to Block 1 in the Tiny Piecing Sampler! These blocks have been a lot of fun to make, and I can't wait for it to all come together! Scroll down for instructions for both the 6" & 12" versions.

Instructions:

6" Block
Make:
(6) 2" Scrappy Triangles*
Cut:
(3) 2 1/2" white squares

12" Block
Make:
(10) 3" Scrappy Triangles*
Cut:
(2) 3 1/2"white squares
(1) 6 1/2" white square

*Note: regular half square triangles can be substituted in for Scrappy Triangles or you can find templates for the Scrappy Triangles here.


6" Block (6 1/2" unfinished)
-Arrange squares and Scrappy Triangles as illustrated.
-Sew together into rows and press.
-Sew rows together.

12" Block (12 1/2" unfinished)
-Arrange squares and Scrappy Triangles as illustrated.
-Sew the two triangles on either side of the middle square together and press.
-Sew all units together into rows and press.
-Sew rows together.


That's it! I would love to see your pictures on Instagram, use the hashtag #tinypiecingsampler so we can find each other!

-------------
You can find the 1", 2" & 3" Scrappy Triangle Templates here.
Find free 6" Scappy Triangle Patterns here.

I'll let you know when there are new patterns, tutorials & sales.
--------------

Friday, November 2, 2018

Fresh & Scrappy Block of the Month Club

Fresh & Scrappy Block of the Month Quilt 2019 - perfect for scraps and fabric leftovers

I am so excited to officially announce the release the 2019 Fresh & Scrappy Block of the Month Club! This quilt is a cheerful celebration of all things scrappy. I designed this Block of the Month specifically to bust through fabric scraps and help you tame those scrap bins. (It's not just me, right?)


Fresh & Scrappy Block of the Month Quilt 2019 - perfect for scraps and fabric leftovers

One of my favorite things about this quilt is the variety of blocks. They are going to spark your creativity and keep you engaged and excited. There are flying geese, fans, log cabins, stars, flowers, chains and more! Most of the piecing is standard, but there will be some machine appliqué and the opportunity to make a block with curved seams. (There will be an option to appliqué this block, if desired.) There are also a variety of block sizes. There are 8", 12" and 16" squares, not to mention 8" x 12" and 8" x16" rectangles. There's nothing boring about this quilt!

Fresh & Scrappy Block of the Month Quilt 2019 - perfect for scraps and fabric leftovers


Here are the details:

-The finished size of the quilt is 56" x 72".

-On the first of each month, starting January 2019, you will receive a pdf quilt block pattern via email. It will contain cutting and piecing instructions for that month’s block, along with tips for using scraps. We will usually make two of the given block, but some months we will make more. I have kept those blocks fast and simple, so it won’t be overwhelming.

-This pattern is perfect for both confident beginners and longtime quilters who want to play with their scraps!

-I am selling on Etsy and the patterns will be sent to the address associated with your Etsy account. If you would like me to email the patterns to a different address, please let me know in the Notes to Seller box when you check out. 

-Today you will be able to download and print the Fabric Requirements and a Coloring Page. Use the coloring page to try out different color combinations or to color in the blocks as we make them.

Fresh & Scrappy Block of the Month Quilt 2019 - perfect for scraps and fabric leftovers


Curious about the Fabric Requirements? You will need:

Low-volume  (whites and creams)
4 yards of assorted low volume fabric, with at least 6 different prints.

Red
3/4 yard total of assorted reds, with at least 5 different prints.

Green
3/8 yard of assorted greens, with at least 3 different prints.

Yellow,  Aqua,  Dark Blue  &  Pink
1/2 yard total of assorted prints for each color, with at least 4 different prints per color.

Orange,  Lime Green,  Light Blue  &  Violet-red
1/4 yard total of assorted prints for each color, with at least 2 different prints per color.

Paper Backed Fusible Interfacing like HeatnBond
1 1/4" yards

Backing Fabric
3 3/4 yards

Binding Fabric
1/2 yard


Fresh & Scrappy Block of the Month Quilt 2019 - perfect for scraps and fabric leftovers


Now thru November 9th, the Block of the Month will be 20% off. (Newsletter Friends, check your email to find a code for an even steeper discount!)

Click on over to check it out! I would love to have you sew along!


Fresh & Scrappy Block of the Month Quilt 2019 - perfect for scraps and fabric leftovers


Tuesday, October 30, 2018

Welcome to the Tiny Piecing Sampler


Make 6" or 12" quilt blocks with these foundation paper pieced patterns - perfect for scrap busting or leftover fabric


Last year, I shared a pattern for 6" Scrappy Triangles each Tuesday during the Year of Scrappy Triangles. It was so much fun to bust scraps with those  foundation paper pieced half square triangles! (If you missed it, you can find links to all the patterns here.)

I want to keep the momentum from the last year, and have decided to post tutorials for quilt blocks that use the 1", 2" & 3" Scrappy Triangles in my Tiny Piecing Collection. (You can find patterns here.) Each Tuesday for the next 12 weeks, I will post a tutorial for a 6" and 12" version of the same quilt block. I'll post links to all the blocks here. By the end we'll have enough blocks for a cute mini quilt or small throw. Swing by next Tuesday to find the first tutorial.
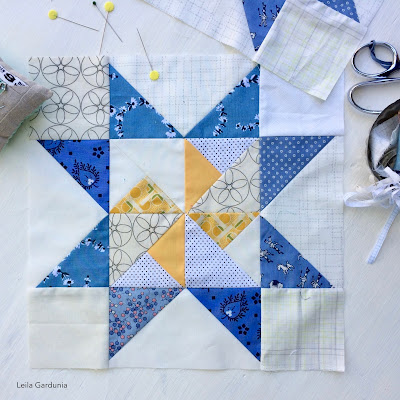


I'd love to see what you make! Post pictures on Instagram with the hashtag #TinyPiecingSampler and tag me, @sewn.by.leila.gardunia


-------------
You can find the 1", 2" & 3" Scrappy Triangle Templates here.
Find free 6" Scappy Triangle Patterns here.

I'll let you know when there are new patterns, tutorials & sales.
--------------