Showing posts with label flying geese. Show all posts

Thursday, August 25, 2011

Corner to Corner Method for Making Flying Geese

Tomorrow I will post instructions for our last Flying Geese block.  I was planning on showing how to make some of the flying geese units with the corner-to-corner method, but I don't have very much of the light yellow fabric I want to use and this method is a bit wasteful of fabric.  So I am just going to introduce the corner-to-corner method tonight.


The pros of this method are that it is fast, easy to be accurate and the math is very straightforward.  It is also useful if you only have to make one or two units.  The only negative is that it uses more fabric than the other methods.

............

Edited (5/15):  The Skill Builder Sampler will is available for purchase in book form!  It has been renamed "You Can Quilt!  Building Skills for Beginners" but covers the same skills with the easy, medium and challenging blocks and is a million times better than the original quilt along.  It is perfect for the beginning quilter or the experienced quilter who wants to branch out and learn new skills.  Find more information and order a signed copy in my Etsy shop or order on Amazon.  Because of the release of the book some posts have been removed.
............

To make a flying goose unit cut a rectangle 1/2 inch longer and wider than the finished flying goose unit.  This will be your goose.  The sides are made from two squares that are 1/2 inch larger than the height of the finished unit.

The rectangle in this example is 4.5 x 2.5.  The squares are 2.5 x 2.5.  Draw a line from one corner to the other of each square.

 Place one square on the side of the rectangle and sew ON the line.


Trim off the corner and press.

Place the other square on the other side of the rectangle with the diagonal line running up towards the other side piece.

Stitch on the line.  Trim off the excess - be sure to leave at least a quarter inch seam allowance.
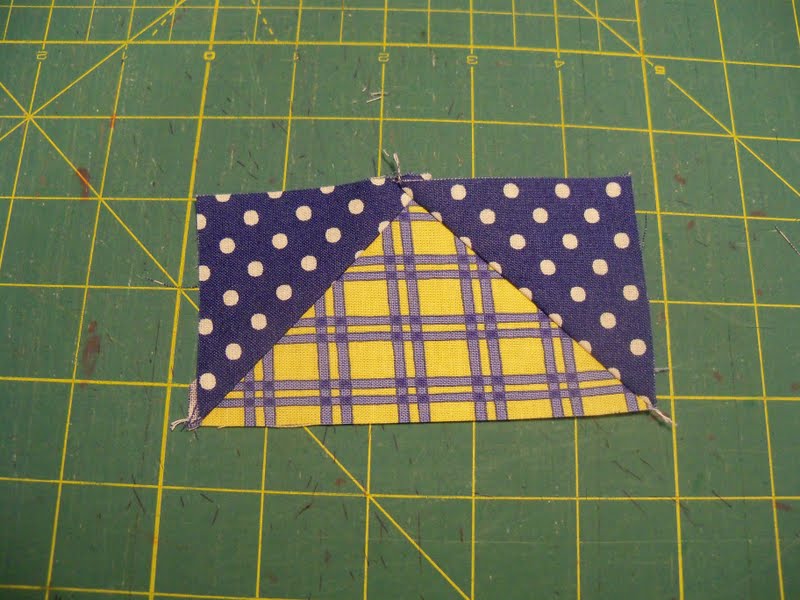
 Press and you are done.

 Now you know three ways to make flying geese:  The traditional/exact method, the "Magic" method and the corner to corner method.

Here are some more very detailed posts on making flying geese units from the Skill Builder Series you might want to read:
Traditional, Squares/Corner-to-Corner and Dimensional
Magic Method (she doesn't call it that, but that's what she means :)  )


P.S.  It is getting late, my mind is fuzzy, Block 9's tutorial isn't done and the kids have dentist appointments tomorrow morning...so the next  block probably won't be posted until tomorrow afternoon.  Sorry.  It will be worth the wait though.  It is one of my favorite blocks so far.

Friday, August 12, 2011

Block 7 - Virginia Star

Welcome!  Ready for another skill?  This month we will focus on flying geese.


This is a flying geese block.  It is made up of three right triangles and is twice as wide as it is high.  The block could be made out of two half square triangles, but using a single piece of fabric for the main (green) triangle gives the finished block a cleaner look - and quite honestly, the fewer seams there are, the less likely we are to mess up.  :)  Flying geese make a great quilt all on their own and are also components of many other blocks.

............


Edited (5/15):  The Skill Builder Sampler will is available for purchase in book form!  It has been renamed "You Can Quilt!  Building Skills for Beginners" but covers the same skills with the easy, medium and challenging blocks and is a million times better than the original quilt along.  It is perfect for the beginning quilter or the experienced quilter who wants to branch out and learn new skills.  Find more information and order a signed copy in my Etsy shop or order on Amazon.  Because of the release of the book some posts have been removed.
............

There are three common ways to make flying geese blocks.  Each way has it's pros and cons.  I will introduce a different method each week.  If you prefer one method over another, feel free to use it instead of the one I show.

I planned on showing the "corner to corner" method today, but the batteries on my camera are dead.  So, instead of staying up until all hours to take pictures after the batteries charge, I am going to refer you to a great tutorial for the same block.  The only difference is that it uses the "exact piecing" method.

I am sooooo lucky that Kate from Swim, Bike, Quilt recently wrote this tutorial as part of the Summer Sampler Series.  I know some of you have already made this block.  If so, you can take the week off and sit by the pool - if not, it is one of the best basic blocks out there.

The points of the Virginia Star are flying geese made with the exact piecing method.  This piecing method is great because it does not waste any fabric and it is easy to make the side triangles out of different fabrics if you want.  The only con is that it requires accurate cutting and 1/4 inch seams.


The basic formula for this method starts with determining the finished size of the flying goose piece.  Once you have determined the size of the finished unit, cut one square that is 1.25 inches larger than the finished base of the flying goose.  Then cut the large square from corner to corner into 4 pieces.  These pieces are the large main section of the goose.

The side triangles are made up of a square that is a 7/8th inch larger than the finished height of the flying goose.  Cut the square in half from corner to corner to get the triangles needed for the sides of the goose.

No worries - Kate gives all the measurements for this block, I just thought you might like the basic formula for future reference.


I am going to send you off to Kate's Virginia Star tutorial  now.  Just one last thought.  The 6.5 inch center is rather large and would be a great place to show off any of your large scale fabrics.  If you want to take this block up a notch, you could also piece a 6.5 inch block to use as your center.  I used an extra 9 patch block I had on hand.  The sky is the limit.  Have fun!