
 |
| From The Purl Bee |
............
Edited (8/15): The Skill Builder Sampler will is available for purchase in book form! It has been renamed "You Can Quilt! Building Skills for Beginners" but covers the same skills with the easy, medium and challenging blocks and is a million times better than the original quilt along. It is perfect for the beginning quilter or the experienced quilter who wants to branch out and learn new skills. Find more information and order a signed copy in my Etsy shop or order on Amazon .
.
 |
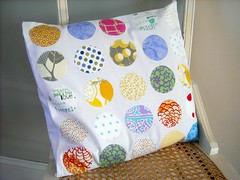
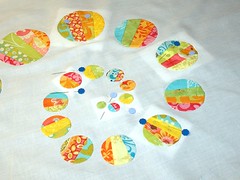
| I'm not 100% thrilled with this layout. I was going for a sweeping arc and got...well, something else. Oh well, I can always add more circles if I want later. |
Use your creativity in size and placement of your circles. The sky is the limit!
Supplies
- 13.5 inch square of background fabric Cut the background fabric a bit larger and then trim it down to 12.5 inches when you are done appliqueing on the circles.
- A variety of fabric scraps for the circles
- Freezer paper You can find this in your grocery store next to the plastic wrap and aluminum foil. We will only be using a bit so you could always borrow a scrap from your neighbor. :)
- Needle and thread Most people swear by straw needles, but we are just starting out, so any thin longish needle that you have should be fine. It is also recommended that your thread color match the color of fabric your are attaching to your background. I didn't have the full rainbow of thread colors so I just used white (my background color) when I didn't have a specific color - not ideal, but it works.
- Compass or various sized circles to trace
- Card stock, interfacing or dryer sheet
- Iron, pins and scissors
 |
| By Jennifer on Flickr |
I started to take pictures of all the different methods, but my pictures weren't great. Then I found a series of You Tube videos on applique. I think the videos make showing how to applique much clearer. Make a circle template in whatever size you desire and then follow the directions for each method. By the time you are done you will have an idea of which method of applique you prefer.
Needle Turn
In needle turn applique, you simply trace the applique shape onto the fabric, cut between 1/8 and 1/4 inch around the shape and then turn under the edges with your needle as you stitch around the shape. And yes, it is easier said than done. I found that I used my fingers to turn under the edges of the fabric more than my needle, but I think that I would improve with practice. This method has the least amount of prep and I think it would be the fastest and easiest method with practice.
To learn how to needle turn applique, watch this great video on You Tube with Nancy Ellen.
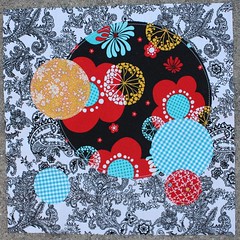 |
| By Amy on Flickr |
Freezer Paper
I was always confused when people talked about freezer paper applique. That is because there are about a million ways to use freezer paper in applique. I am going to link to the methods that are most common and seem to work the best.
Freezer paper has a mat paper side and a shiny waxy side. If you iron freezer paper waxy side down onto fabric it sticks well and can be easily removed. It can be ironed on and removed multiple times before it loses it's sticking power. It is these properties of freezer paper that are exploited to make applique easier.
This video produced by Connecting Threads shows how to use freezer paper to turn under the edges of the fabric. The freezer paper is kept in the fabric while it is sewn onto the background fabric and is removed by cutting a slit on the backside of the background fabric. Instead of using the applique glue as shown in the video, you can simply pin the shape in place.
In this video the freezer paper is removed prior to sewing on the applique.
Shabby Fabrics has a very detailed series of videos on freezer paper applique if you want to learn more.
Most of these videos use mini irons to iron under the seam allowances - and I think that would be a good idea if you were doing tons of applique - but I found that my big iron worked just fine. Just let the tip of the iron do the work and remember you can always peel off the fabric and start over if you need to.
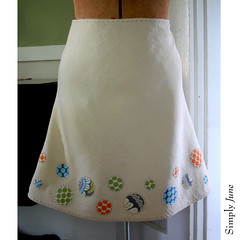 |
| I am in LOVE! Applique circle skirt by junesimply via Flickr |
This is the first kind of applique I ever tried. You trace your shape onto interfacing, a dryer sheet or thin muslin, place the interfacing onto the right side of your fabric and sew along the line. Then you make a slit in the interfacing and turn the whole thing inside out. Make sure you really work the seams so you get a smooth line - you might want to trim the seam allowance down to 1/8 inch. Then you pin and stitch. Here is a video that demonstrates the method.
This video shows how to use sticky interfacing so you don't have to pin.
 |
| By Emma via Flickr |
Gathered Circles
I think this method is the absolute best for making circles but you can't really use it for other shapes. I couldn't seem to find a great stand alone video for this method, so skip to minute 4:45 on this video to see how they make their perfect applique circles.
One final bit of advice: PIN! You know how some of the circles on my block are all cool and overlapped? That is because I didn't pin one of my circles and it shifted - leaving me with a big lopsided mess that I had to cover up. You have been warned. :)

Next Friday we will start working on appliqueing vines and shapes with points. See you then!
(And before then I will share some pictures from my trip - so much fun!)
I am so glad I became a follower of your blog, thanks for all those links. How was Paris?
ReplyDeleteI love how , in the last video, she keeps referring to the circle as a square, I know just what she means, but the square circle is a treat!
ReplyDeleteI am totally scared this time. But, here we go...
ReplyDeleteDo you know why on shabby fabric she uses two layers of freezer paper?
ReplyDeleteThis was another fun exercise; I had no idea there were so many ways to do applique, having only done the easy fusible way up till now! I've done four different kinds, and have one more to go, but have to find freezer paper at the supermarket tomorrow. Hope to have this block on the Flickr group by the weekend ;-)
ReplyDeleteIt is because she is marking on the shiny side of the paper. Because she is marking on the shiny side, she has to use a permanent marker and because it is permanent, she doesn't want to chance it rubbing off onto the fabric so she sandwiches it between two pieces of freezer paper. Kind of seems like more work than necessary - I would just use pencil on the paper side, but it probably gives the template more strength too.
ReplyDeleteYou totally caught me being a slacker...I had skipped watching that video because I thought it would be the same process as everyone else's. Just goes to show that I shouldn't cut corners and that there really are a million ways to do applique.
Did you realise that your freezer paper is not available in Australian supermarkets? We have a different substance - freezer plastic - for keeping layers of food apart. I searched high and low in our shops, and finally found American freezer paper in a fabric shop, where they had one roll of it, and sold it for $1.10 a metre! And after all that, I found it fiddly to use, but I've done two circles with the paper on my block, just to prove to myself that I did actually try. But I think my favorite techniques are the ones using the interfacing.
ReplyDeleteHey... Neighbor Leila... could I borrow a bit of freezer paper? Like a 3" square? I bought wax paper because I thought it was the same thing and it's totally not!
ReplyDelete